
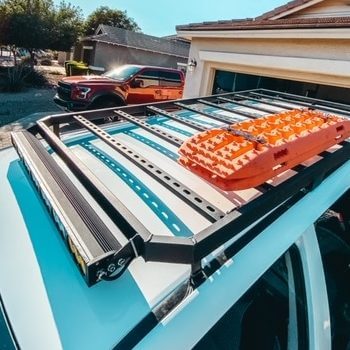
4Runner Roof Rack Garage Build
If you are reading this, then you probably love going on adventures in your 4Runner and would love to be able to store gear easier on the roof, but you just can’t justify paying $800-$2000 for a roof rack. That’s where we were… We are are handy family and love some DIY projects, so we figured it would be fun to share our home built roof rack design for the 5th Gen Toyota 4Runner that cost us roughly $190 in materials (and plenty of elbow grease, as always)
- 1in x 2in, 16 gauge rectangular steel tubing – $40
- 1-5/8-in x 13/16-in Half Slot Channel Strut (Qty 8) – $130
- 2in x 2in L channel – $5
- 2in x 1/8in thick steel strap – $5
- 3/8 x 3/4 x 1-Inch tall spacers – $10
Note: These were local hardware store prices, so shop around …but if you can’t find the spacers, amazon sells them, but a bit more pricey.
We decided to use the steel tubing because it is easy to work with, has a good form factor and is actually pretty light for its strength. The steel rack weighed in at 55lbs, which is only 5 lbs heavier than equivalent aluminum 80/20 racks. The other key reason for picking steel, was to be able to weld the strut channel to it. The slotted strut channel make mounting equipment or using tie down straps super nice and easy, it is the biggest selling point really.
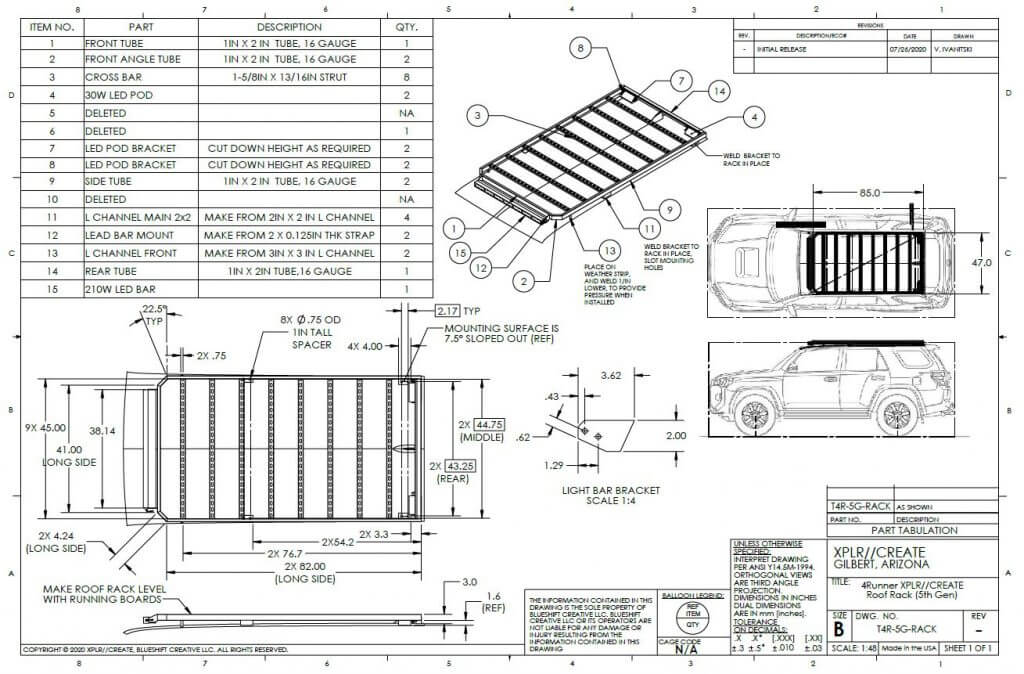
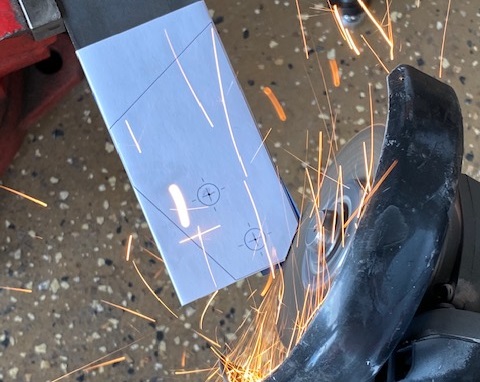
Okay, lets get into the good stuff. Here is a drawing we put together that should give you all the dimension you need to build a rack yourself with just an angle grinder (vertical chop saw is very helpful though) and a welder. If you would like a higher resolution PDF, just complete the form at the bottom of the page.
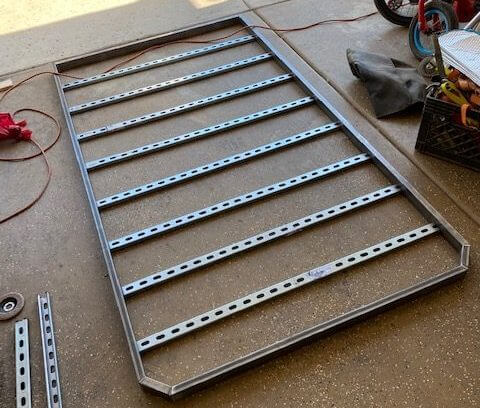
Cut all of the pieces to their correct lengths, and lay everything out before tacking in place. Make sure everything is square by measuring the diagonals corner to corner. You can choose how high you want to cross bars to be, but we set ours to be 1/4in below the top of the frame. This way it is still relatively flat for large items, yet has a bit of a border so that if we ever strap tubs up there they have an extra layer of protection with the perimeter border to keep them from sliding off.
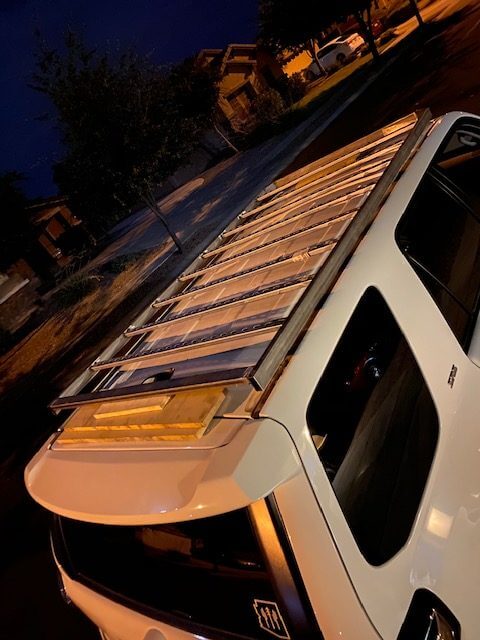
Once the rack is all tacked together, place it on the roof, and shim it to your desired height. We made it so that the top of the strut cross bars was 1/4 of an inch above the tip of the rear antenna, this made the overall rack 3in tall over the center of the roofline. We also recommend using a level to make the rack parallel to the running boards which are in line with the frame.

Once you have the height set, bolt on the mounts using the OEM bolts and the 1in spacers. The middle and rear mounts can be positioned so that they are contacting the edges of the frame, and are easy to tack in place on the car (using a fire blanket or similar to avoid damaging the paint. Position the front mount so that the small foot rests on the weather stripping. Then either lift the rack 1/8th of an inch, or press down as hard as you can while you tack it in place, this will make the front mount apply pressure to the weather stripping and provide a bit more support (this is exactly how all the big dollar no drill racks do it).
If you want to make a light bar mount, we have provided those on the drawing as well; just scale them up 4x, print out on paper, and tap the paper to the 2 in strap steel for cutting.

We used a 38in 210W LED bar, and so far it has been working out great, you can space these out to use whatever width light bar you feel like running.
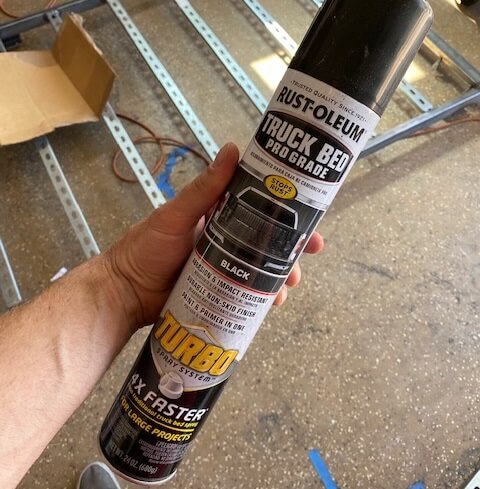
Once all your welding is done, you can just spray paint the rack for several dollars, but we opted to spray it with truck bed liner. The Rustoleum Truck Bed liner works really well and has a perfect finish for this, one recommendation is to NOT use the cans we tried that are “4X FASTER” as they have a very wide spray pattern which is perfect for large flat surfaces, but wasteful when spraying narrow tubes. Just get two cans of these, and you’ll be happy.

The bed liner finish is perfectly textured to be grippy, but is not going to tear up your hands or gear. It is also durable and seems to be holding up to the Arizona sun very well.
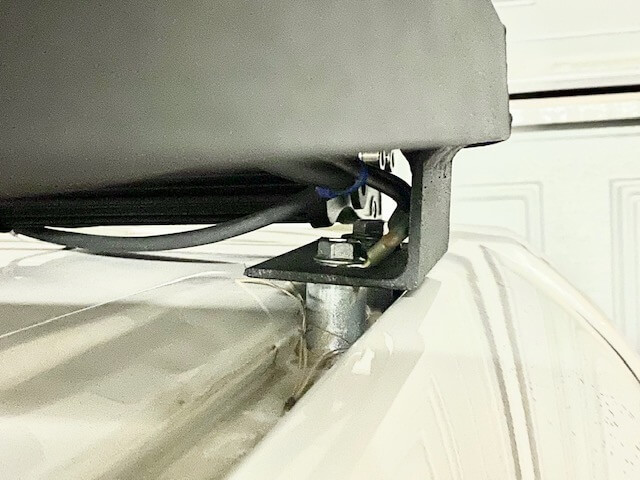
Finally, once you have the rack positioned on the spacers for the final fitment, run a bead of silicone RTV sealer around the spacer, just to help keep water out of the mounting hole threads.
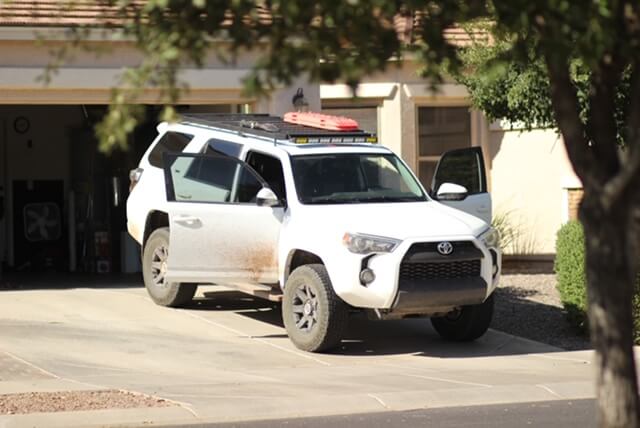
And there you have it, a very durable, very useful, and very affordable home made diy roof rack for your 5th gen 4Runner. We have used ours for many trips now and don’t have a single complaint, Even the wind noise is very minimal (the positioning of the light bar actually helps divert air and avoids any whistling of air between the roof and the rack.

Plenty of room for gear with convenient tie down holes.
Makes strapping down large paddle boards super easy and secure.
HI-RES PDF DOWNLOAD:
September 18, 2020 at 5:25 am
Hereby request you email me the high resolution PDF of your roof rack design per your offer. Thank you much in advance. Can’t wait to try making one.
September 24, 2020 at 5:56 pm
Of course! I will email it over today. Thanks for your interest!
November 18, 2021 at 2:43 pm
Can I get a copy too? Awesome design for Hawaii wheelers.
December 1, 2021 at 12:57 am
Hi there is it ok to get a PDF for the roof cage plans please?
December 9, 2021 at 12:38 pm
Emailed you a copy, be sure to share photos of the build!
January 16, 2022 at 7:04 pm
Have you put a roof top tent on it?
March 4, 2022 at 8:37 am
of course, thats what it was built for. We run a Tuff Stuff Alpha hard shell on it. the slots in the channel make it really easy to mount.
November 3, 2022 at 1:07 pm
Can I please have a copy for the PDF in high ress? Thank you! I’ll post some picts after its done.
January 5, 2023 at 8:39 am
We have made the PDF available for download at the bottom of the article, enjoy, and be sure to send progress pics!
October 1, 2020 at 5:18 pm
Looks awesome!!!! Great job! May I also request a detailed PDF via email? Waaaay cheaper than buying a manufactured one for sure and it looks just as good IMO.
October 21, 2020 at 3:38 am
Thank you! We will email it over to you!
August 22, 2021 at 12:05 pm
Me too please
October 6, 2021 at 10:25 pm
I just emailed you the pdf.
October 7, 2020 at 2:22 am
Can I grab the pdf as well? Looks awesome!!
October 21, 2020 at 3:39 am
Emailing it over to you! Thanks!
May 24, 2021 at 11:27 am
Great design and i love to have the high resolution pdf, thanks for the ideas
June 14, 2021 at 8:28 am
Sent you and email
October 7, 2020 at 4:01 pm
Came across this while looking up DIY options and this is by far th best ive seen. Well done!
October 7, 2020 at 4:02 pm
Is it possibel to receive the PDF plans for this please!?
October 21, 2020 at 3:40 am
Emailing it over to you!
November 29, 2020 at 6:36 pm
I’d love the high res pdf if you’ve got it!
January 4, 2021 at 8:58 pm
Sent!
November 30, 2020 at 4:48 pm
Could I also get the PDF emailed? Thank you so much!
January 4, 2021 at 8:57 pm
Sent!
December 6, 2020 at 8:16 am
You’re probably sick of it but I would love the pdf if possible 😄
January 4, 2021 at 8:56 pm
Sent!
December 9, 2020 at 8:05 pm
Wow, what a great design. You have inspired me to try it.
Can I have a copy of the pdf as well?
Thanks
January 4, 2021 at 8:55 pm
Sure thing! Thanks for the kind words. Sending now!
December 28, 2020 at 1:51 am
Exactly what I was wanting to build, could I get a copy of your PDF as well! Thanks in advance.
January 4, 2021 at 8:54 pm
Sent!
January 3, 2021 at 4:09 am
Looks great! Can I get the pdf plans please?
Thanks!
January 4, 2021 at 8:52 pm
Sending now!
January 19, 2021 at 12:05 pm
Love the design! Can i please get a copy of the pdf. Thank you 🙂
January 19, 2021 at 7:12 pm
Sent you an email!
January 20, 2021 at 4:51 am
Add to the email list please! This is awesome!
January 21, 2021 at 1:08 pm
Emailed you the PDF.
January 25, 2021 at 4:24 pm
I love the look! Can I receive PDF and list as well? Thank you
January 26, 2021 at 9:04 am
Emailed you the PDF!
January 26, 2021 at 7:35 am
Curious what the bolt hole distances are front to rear for the mounting feet? Maybe a high res version would reveal?? Email would be awesome. Thanks for your work.
January 26, 2021 at 9:04 am
Matt, the PDF has the dimensions, sent it to your email!
January 29, 2021 at 9:53 pm
Nice and well done. I stumbled across this researching ideas for my own build. Could I bother you for the PDF?
Thanks!
February 3, 2021 at 1:21 pm
Sent you an email.
February 9, 2021 at 11:20 pm
Is it still possible to get the PDF?
March 4, 2021 at 8:34 pm
Just sent you an email, be sure to share photos of your progress! enjoy!
February 10, 2021 at 11:35 am
Hi Great one
Can I also have PDF please
Thank you in advance
March 4, 2021 at 8:34 pm
Just sent you an email, be sure to share photos of your progress! enjoy!
February 21, 2021 at 7:17 am
Could I also get the PDF emailed? Thank you so much! great project
March 4, 2021 at 8:34 pm
Just sent you an email, be sure to share photos of your progress! enjoy!
March 3, 2021 at 5:05 pm
Hola, me encantaría recibir el pdf, es asombroso!
March 4, 2021 at 8:34 pm
Just sent you an email, be sure to share photos of your progress! enjoy!
March 8, 2021 at 6:29 pm
My I also have a copy of the plans. Looks great
March 31, 2021 at 10:36 pm
Sent via E-Mail, please be sure to share your progress!
April 20, 2022 at 5:35 am
Can I get the pdf of your roof rack design?
January 5, 2023 at 9:28 am
We have made the PDF available for download at the bottom of the article, enjoy, and be sure to send progress pics!
March 15, 2021 at 7:20 am
Can I grab the pdf as well? Looks awesome!!
March 31, 2021 at 10:36 pm
Sent via E-Mail, please be sure to share your progress!
March 17, 2021 at 12:29 pm
This is an awesome design and I would really like to try this out. Could I please get a copy of the pdf as well when you have the time? Thank you so much.
March 31, 2021 at 10:36 pm
Sent via E-Mail, please be sure to share your progress!
March 22, 2021 at 9:12 am
Would i be able to get a PDF as well? Thinking doing a modified version (3/4 version) Thanks!
March 31, 2021 at 10:37 pm
Sent via E-Mail, please be sure to share your progress!
March 23, 2021 at 8:37 am
i would like to get the pdf version too please, i plan on mimicking this on my chevy tahoe so wont be exact but love the way this looks. we are going to use it to mount roof tent, awning, and traction boards so we will step up to the 14 gauge for strength on perimeter and tent mount and only use what is needed to mount tent cross bar wise to save weight.
March 31, 2021 at 10:37 pm
Sent via E-Mail, please be sure to share your progress! Would love to see how you adapt this to a Tahoe.
April 8, 2021 at 9:35 am
Great design and build. Could I get a copy of the pdf as well?
April 9, 2021 at 12:15 pm
Sent!
April 8, 2021 at 9:36 am
Awesome!! Fits the 4Runner perfect. Can I get a copy of the pdf?
April 9, 2021 at 12:15 pm
Thank you! Just emailed over!
April 8, 2021 at 12:00 pm
WOW!!! that is a great design and better than 99% of the ones i have seen online for home made. I would love to have a copy of the plans for my 4Runner if possible.
thanks, and GREAT JOB!!!
April 9, 2021 at 12:15 pm
Thanks so much, Travis! I just emailed the guide over to you.
April 19, 2021 at 10:54 pm
Im actually going to use this and modify it for a bed rack on my tacoma. Thank you for taking the time to make this! If you would, I’d also like to see the high-definition version please. I see you have gone out of your way to do that for so many people, thanks again!
April 30, 2021 at 9:52 pm
Sure thing, email sent! Please send pics of your progress, as we love seeing the final results!
April 30, 2021 at 4:44 am
Awesome rack guys🙌👌 can you send me the PDF please
April 30, 2021 at 9:56 pm
email sent! Please be sure to share progress photos of your build
April 30, 2021 at 2:25 pm
Awesome job on the rack guys👌 any chance I can get the PDF please?
April 30, 2021 at 9:57 pm
email sent! Please be sure to share progress photos of your build
May 1, 2021 at 10:44 pm
Can I please get a copy of your PDF plans, this is awesome!
May 1, 2021 at 10:45 pm
Really great work. Can I please get a copy of your PDF plans please
May 2, 2021 at 7:12 am
Email sent! be sure the share progress pics!
May 2, 2021 at 11:28 pm
Could I get a copy of that pdf file please.
May 6, 2021 at 9:31 am
Sent vie email. Be sure to send progress pics
May 5, 2021 at 1:51 pm
Can you please email me the pdf as well? I’m trying to find the distance between the mounting holes front and back
May 6, 2021 at 9:32 am
Sent you the PDF. The spacing is ~50.9inches from the back hole of the front mounting tab to the back hole of the rear mounting tab.
May 28, 2021 at 1:15 pm
This is great. Could I please get the PDF as well? Thanks for sharing!
June 14, 2021 at 8:28 am
Glad you like it! Sent you and email
June 10, 2021 at 2:29 am
Pdf perease
June 14, 2021 at 8:29 am
Sent you and email, please be sure to share photos as you build your rack!
June 10, 2021 at 9:22 pm
Can I get a copy of the .pdf please?
Excellent writeup and very grateful you put this together.
June 14, 2021 at 8:29 am
Hope this helps you put something together! We love seeing the progress photos of the builds, so please be sure to share! Sent you and email
June 13, 2021 at 3:05 pm
If possible I would love the PDF. Looking for something just like this for my Suburban.
June 14, 2021 at 8:30 am
Adam, sent you an email, hope this helps you put something together for the suburban! Please be sure to share as that would be cool to see!
June 23, 2021 at 1:40 pm
THIS IS EPIC! and WAY cheaper then anything prefab. would love a PDF if your still sharing!!
dont suppose you have anything in the works for a front bumper? (low profile or full, either way lol)??
July 6, 2021 at 12:48 pm
No bumpers (yet) but who knows what the future has in store 🙂
June 25, 2021 at 2:49 am
Could i get a copy of that PDF file please?
July 6, 2021 at 12:48 pm
Sent via email! be sure to take pics and share your build with us 🙂
July 24, 2021 at 4:15 pm
Can I please get a copy of the pdf files please, and thanks.
July 26, 2021 at 10:19 am
Sent you an email, cheers!
July 31, 2021 at 12:40 am
I jist ordered 2021 4runner trd offroad! May i have a pdf file please?
October 6, 2021 at 10:26 pm
Sweet! emailed you a PDF, would love to see the finished build!
August 19, 2021 at 7:39 pm
I too, would love to get a copy of the PDF if it is still available please! That looks awesome!
October 6, 2021 at 10:25 pm
I just emailed you the pdf.
August 25, 2021 at 8:38 am
Can I get a copy of the PDF as well? Thank you!
Also, can you provide any details on your welding setup?
October 6, 2021 at 10:07 pm
Hi Ben, I use a Miller 210 MIG welder, the settings vary depending on the type of weld, but I think I did most of this rack at Voltage: 3, Wire Speed: 45(ish)
September 12, 2021 at 6:13 pm
Could you send this to me please? Greatt work!
October 6, 2021 at 10:25 pm
I just emailed you the pdf.
September 14, 2021 at 5:11 am
Great design. Could I possibly please have the PDF as well?
October 6, 2021 at 10:24 pm
Thanks! I just emailed you the pdf.
September 19, 2021 at 7:23 pm
Hi. Top roof rack. Could i get pdf please
October 6, 2021 at 10:24 pm
emailed you a copy
September 20, 2021 at 5:09 pm
That’s such a rad looking DIY rack. May I get a copy of the pdf as well?
October 6, 2021 at 10:24 pm
Thanks! emailed you a copy
September 21, 2021 at 8:32 am
how can i get the plans ?
October 6, 2021 at 10:24 pm
emailed you a copy
September 23, 2021 at 1:36 pm
Can I please get a copy of the PDF As well? This is badass! Thank you!
October 6, 2021 at 10:23 pm
Thanks! emailed you a copy
September 29, 2021 at 8:42 pm
I have a 4th gen, but I love the design. Could you send me your PDF drawing? It would help get my own build off the ground. Thanks!
October 6, 2021 at 10:23 pm
give it a go! sent you an email
October 4, 2021 at 8:53 pm
This is by far the best diy design I’ve seen online! Can I get a copy of the pdf design please? Thank you🤙🏽
October 6, 2021 at 10:23 pm
Thanks! looking forward to seeing what you do with it! emailed you the file
October 10, 2021 at 4:09 pm
This diy looks awesome, would love a copy of the pdf to try out. Thank you
December 9, 2021 at 12:41 pm
Emailed you a copy, be sure to share photos of the build!
October 25, 2021 at 4:50 pm
Great design. Cant wait to make the same for my car. Can i have the pdf detail. Thanks
December 9, 2021 at 12:40 pm
Emailed you a copy, be sure to share photos of the build!
October 31, 2021 at 8:47 am
Please email me a copy of your great pdf. I am excited to get started. Rj34953@yahoo.com
Thanks in advance.
Ridney
December 9, 2021 at 12:40 pm
Emailed you a copy, be sure to share photos of the build!
November 8, 2021 at 7:29 am
Hey there, could I please get the copy of the pdf? This looks great, now I just need to learn how to weld.
December 9, 2021 at 12:39 pm
Emailed you a copy, be sure to share photos of the build!
November 18, 2021 at 5:23 pm
I would love a copy of your design!
Could you email me a copy?
December 9, 2021 at 12:39 pm
emailed, thanks for your patience!
November 27, 2021 at 11:16 am
Could I please get a copy?
Mikellumi@gmail.com
Thanks!
December 9, 2021 at 12:38 pm
Emailed you a copy, be sure to share photos of the build!
December 29, 2021 at 11:14 pm
Hello thanks for sharing, can you send a copy of the drawing if you have a cad file will be great wish tho Develop a version for sprinter
January 3, 2022 at 12:59 pm
Emailed you the PDF, cheers!
March 29, 2022 at 4:29 am
Good Morning. I love this build and can’t wait to get started. Can you email me the pdf please. Thanks for sharing this build with us.
January 5, 2023 at 9:30 am
We have made the PDF available for download at the bottom of the article, enjoy, and be sure to send progress pics!
January 29, 2022 at 2:39 pm
Would it be possible to get the pdf emailed over?
Thanks in advance
January 9, 2023 at 9:54 am
We have made the PDF available for download at the bottom of the article, enjoy, and be sure to send progress pics!
February 6, 2022 at 7:33 am
This will be a great add on for my Overland trailer build. Can you send the PDF layout for me? Appreciate your time and effort
January 9, 2023 at 9:53 am
We have made the PDF available for download at the bottom of the article, enjoy, and be sure to send progress pics!
February 6, 2022 at 3:27 pm
This is a great idea. I’m working on my build of an overland trailer and this would be a great addition for more storage on top. Would appreciate it if you could send a copy of your pdf file for the build. Thanks in advance
January 9, 2023 at 9:54 am
We have made the PDF available for download at the bottom of the article, enjoy, and be sure to send progress pics!
February 8, 2022 at 10:00 am
Could I get a copy?
rcasper96@gmail.com
January 9, 2023 at 9:53 am
We have made the PDF available for download at the bottom of the article, enjoy, and be sure to send progress pics!
February 9, 2022 at 2:24 pm
May I also get a copy
January 9, 2023 at 9:53 am
We have made the PDF available for download at the bottom of the article, enjoy, and be sure to send progress pics!
February 28, 2022 at 5:12 pm
Hey, great design! I’d like to have a copy of your PFF blueprint. Thanks.
January 5, 2023 at 9:31 am
We have made the PDF available for download at the bottom of the article, enjoy, and be sure to send progress pics!
March 20, 2022 at 2:08 pm
hello,please can you send me the drawings?Thank You……
January 5, 2023 at 9:31 am
We have made the PDF available for download at the bottom of the article, enjoy, and be sure to send progress pics!
April 12, 2022 at 10:55 am
Hey! Great job, thanks for sharing, can you send a copy of the drawing?
January 5, 2023 at 9:29 am
We have made the PDF available for download at the bottom of the article, enjoy, and be sure to send progress pics!
April 16, 2022 at 11:45 pm
Wow! What a professional job! It looks fabulous and is exactly what I am looking to make. (Adapted to a truck topper on my Tundra and one for my 3rd Gen 4runner)
I would love the PDF please and thank you…
January 5, 2023 at 9:28 am
We have made the PDF available for download at the bottom of the article, enjoy, and be sure to send progress pics!v
April 28, 2022 at 5:17 pm
I am hoping you are still able to email your plans. My email is mlwilliams11502@gmail.com.
Thanks in advanced wish me luck. 🙂
January 5, 2023 at 9:26 am
We have made the PDF available for download at the bottom of the article, enjoy, and be sure to send progress pics!
May 5, 2022 at 10:30 pm
Hi, this looks really good! If you don’t mind I would also like a copy of the pdf. Thanks!
January 5, 2023 at 9:25 am
We have made the PDF available for download at the bottom of the article, enjoy, and be sure to send progress pics!
May 6, 2022 at 7:52 pm
That’s awesome! Can I get a copy please?
January 5, 2023 at 9:25 am
We have made the PDF available for download at the bottom of the article, enjoy, and be sure to send progress pics!
May 8, 2022 at 8:58 am
Great build would love a copy of the pdf as well.
I started. Using uni-strut for bed rails on my pick yp
January 5, 2023 at 9:24 am
We have made the PDF available for download at the bottom of the article, enjoy, and be sure to send progress pics!
May 17, 2022 at 8:26 pm
Could I get a copy of the pdf
May 26, 2022 at 10:57 am
Hi there I like your roof rack design very much. I’m trying to find a way to manipulate it to work on my Econoline van that unfortunately has no existing holes I’m the roof to mount anything and the gutters seem to change , curving in towards the end will have less cmwarwndenin the middle than the ends. Your pdf’s will. Be very helpful. I hope you get this and thanks in advance.
May 27, 2022 at 6:52 pm
This is an awesome build! Could I have the PDF as well?
May 28, 2022 at 4:47 pm
Is it possibel to receive the PDF plans for this please!?
May 28, 2022 at 4:48 pm
Is it possibel to receive the PDF plans for this please!?
I will do o e like that.
May 30, 2022 at 1:58 pm
I would love to have a copy of the pdf.
Hope I can build one of my own 😄
July 6, 2022 at 4:17 pm
Can I have the pdf please?
July 15, 2022 at 6:32 am
Great plans. Would you please send me the PDF you offered in the description? Thanks
July 25, 2022 at 1:51 pm
Design looks fantastic. Are you able to share the PDF? Thank you!
July 26, 2022 at 5:56 am
Love the build. Well done. Would you be able to send the detailed PDF? Thanks!
July 26, 2022 at 1:35 pm
Can I have the pdf too? Excellent article.i emailed the other address but not sure if it gets through as everyone is posting here.
September 21, 2022 at 9:55 pm
Stumbled upon this DIY. Any good chance of having the .pdf?
Otherwise, can those got the PDF to share?
Thanks in advance.
January 5, 2023 at 8:48 am
We have made the PDF available for download at the bottom of the article, enjoy, and be sure to send progress pics!
July 31, 2022 at 8:31 pm
Hi! Love the design of the rack! Could you send me a copy of the hi res .pdf? May expand on it for my Land Cruiser also!
September 8, 2022 at 12:34 pm
This is AWESOME! If your still giving out the PDF I would love a copy. I live in AZ and this looks perfect for my 4runner.
January 5, 2023 at 8:52 am
We have made the PDF available for download at the bottom of the article, enjoy, and be sure to send progress pics!
September 11, 2022 at 3:46 pm
Hi, Could I please request a copy of your design? Many Thanks!
January 5, 2023 at 8:51 am
We have made the PDF available for download at the bottom of the article, enjoy, and be sure to send progress pics!
September 14, 2022 at 12:08 pm
Hi! could you please share the pdf?
Thanks in advance!
January 5, 2023 at 8:48 am
We have made the PDF available for download at the bottom of the article, enjoy, and be sure to send progress pics!
October 1, 2022 at 8:08 am
Can I get a copy of the plans? Thanks!
January 5, 2023 at 8:47 am
We have made the PDF available for download at the bottom of the article, enjoy, and be sure to send progress pics!
October 11, 2022 at 12:34 pm
Could I also get the pdf for this build ? Just got a rtt and itching to build one !
January 5, 2023 at 8:43 am
We have made the PDF available for download at the bottom of the article, enjoy, and be sure to send progress pics!
October 11, 2022 at 7:47 pm
Hi can you email me the PDF thanks, looks great can wait to build it
January 5, 2023 at 8:43 am
We have made the PDF available for download at the bottom of the article, enjoy, and be sure to send progress pics!
October 12, 2022 at 3:01 pm
Hi can I get a copy of your .PDF drawing.
Thank you!
January 5, 2023 at 8:43 am
We have made the PDF available for download at the bottom of the article, enjoy, and be sure to send progress pics!
October 13, 2022 at 2:38 am
I would like the high resolution pdf as well. Does it include supply list and instructions?
January 5, 2023 at 8:43 am
The supply list is in the top left corner of the PDF, this article is the build guide, use your best judgement while building. We have made the PDF available for download at the bottom of the article, enjoy, and be sure to send progress pics!
October 24, 2022 at 8:30 pm
Great plans. Would you please send me the PDF you offered in the description? Thanks
January 5, 2023 at 8:40 am
We have made the PDF available for download at the bottom of the article, enjoy, and be sure to send progress pics!
November 19, 2022 at 9:49 am
Amazing job! The premade roof racks available are all so expensive compared to the quality of the materials they are made from. I had not considered using Unistrut, but it makes so much sense! It might be prudent to point out, however, that passivated metals, like galvanized steel etc. is dangerous to weld on as the passivation will burn off into toxic fumes. Not a deal breaker, it’s not nerve gas, and, I’ve welded on lots of galvanized steel, you just need to take precautions: weld outdoors if possible and use a fan to blow the smoke away from you.
January 5, 2023 at 8:39 am
Yes, valid points on the steel coating. We prepped the weld points with a flapper wheel to grind down the coating the best one can to improve weld quality.
November 27, 2022 at 3:28 pm
Excelente diseño… Les dejó mi correo para obtener el PDF… Muchas gracias de antemano por compartirlo…👏👏
November 27, 2022 at 3:29 pm
Excelente diseño… Felicitaciones!! Les dejó mi correo para obtener el PDF… Muchas gracias de antemano por compartirlo…👏👏
January 5, 2023 at 8:35 am
We have made the PDF available for download at the bottom of the article, enjoy, and be sure to send progress pics!
December 22, 2022 at 9:13 pm
Favor si aun esta disponible enviar pdf… Gracias de antemano esta genial el diseño.
January 5, 2023 at 8:32 am
We have made the PDF available for download at the bottom of the article, enjoy, and be sure to send progress pics!
December 31, 2022 at 1:11 am
Great design. Simple, clean and to the point! I’d love a copy of the pdf if you’re still providing them.
January 5, 2023 at 8:31 am
We have made the PDF available for download at the bottom of the article, enjoy, and be sure to send progress pics!